The little girl is a fan of iced tea. But we dislike Nestea or any
of those "tea" drinks that are really just sugar, water and flavoring.
The good news is that she likes real tea... even the ones served at
Chinese restaurants. But her favorite is rooibos - caramel or Strawberry!
Anyway, we found dalandan at the local organic
market the other day and she wanted some. She said she wants the fruits for the juice to make tea. I had to explain that to qualify as tea, there should be more than the fruit.
I was actually confused for a
while because the name plate read "Mandarin" so I asked the saleman
what it was. He said (at first) that it was the local orange or kahel.
And I just had to ask because as far as I know the local orange is
dalandan. He finally admitted that it was. Of course I haggled the
price of the dalandan to a reasonable one. I also wondered how many
people were fooled into paying a higher price for dalandan that was
marketed as "Mandarin"...
Here is our dalandan rooibos iced tea!
The recipe:
about 7 pieces of largish dalandan, juiced
3 tablespoons caramel rooibos, steeped in 1/2 liter of hot water then strained and cooled
1 liter cold water
agave, as sweetener, to taste
Just mix everything in a juice pitcher. Throw in a couple of slices of dalandan and chill thoroughly!
Here
are the juiced dalandan. The little girl was happy to help. Actually
she wanted to use the citrus juicer! I used the reamer!
The
dalandan fruits were seedless so no straining necessary! And I do love
a pulpy drink! Feels more authentic... somehow. The little loved her
dalandan iced tea, although she asked for more sweetener.
Thursday, July 31, 2014
Sunday, July 27, 2014
Apple Beignets
I still had a couple of small Fuji apples in the fridge and I wanted a
way to use them, without using the oven. I didn't want to eat them plain either!
So off I went to find a recipe and I found these beignets. Of course I didn't have pears so I doubled the apples instead. I also added cinnamon and nutmeg (a "simple" form of apple pie spice). Then I didn't have a vanilla bean so I used cinnamon sugar instead, although I didn't dip the beignets in the cinnamon sugar, I just placed it on the side as an optional "dip"
They were yummy, but I discovered that little balls of dough were better... they cooked faster too!
How I made them -
Melt 1/2 cup butter (I used salted butter) and 1 cup water; bring to a boil. Remove from the fire then add 2 tablespoons sugar and 1 cup all purpose flour; stir at once to incorporate. Place the pan back on the stove on low fire and continue stirring, less than a minute or so, until the dough thickens (dough should "come away from the sides of the pan"). Transfer the dough into a mixing bowl and let it cool several minutes. Add 3 eggs, one at a time, mixing well after each addition until no trace of the egg can be seen (I used a hand mixer). Stir in 1/4 teaspoon of cinnamon and 1/8 teaspoon of nutmeg. Fold in apple cubes (small cubes from 2 small Fuji apples).
Using half a tablespoon or a tablespoon measure, drop into super hot oil and deep fry until the the balls puff up and "crack" a little. Remove from the oil and drain on paper towels. Serve with cinnamon sugar on the side.
To make cinnamon sugar, mix together 1/4 cup fine granulated sugar and 1 tablespoon of cinnamon powder.
Wednesday, July 23, 2014
Green Papaya Salad, My Way...
My way being a rather bastardized version of the Thai green papaya salad (Som Tam)...
Truth is, ever since I tasted a really delicious green papaya salad at a lovely Thai restaurant, I'd been obsessed with making one...
The original version uses long beans but I forgot to get some at the market, so I substituted a small carrot instead. Also, I was told that to make the salad, the traditional way was to "hack" the papaya with shallow cuts using a knife then slicing thinly across the hacked cuts to make the strips (the technique was actually shown to me by our old/ex household help using an Indian mango!). I actually tried to do it except that I was so afraid to cut my hand. I ended up using a julienne peeler, which I got at the Japanese thrift store! Fast and easy!
The recipe for my bastardized version...
1 green papaya, about 500 to 600 grams, julienned
1 small carrot, julienned
2 small tomatoes, sliced
1/4 cup chopped roasted peanuts
3 cloves garlic
1 to 2 pieces siling labuyo (birds eye chili)
1 tablespoon dried shrimp
juice from about 6 pieces medium sized calamansi
1/2 teaspoon bagoong (shrimp paste)
2 to 3 tablespoons fish sauce
1/2 tablespoon coconut sugar
Place the garlic, chili, dried shrimp, juice, bagoong, fish sauce and coconut sugar in a small mortar and pound with the matching pestle until it is pasty and liquidy. Add half of the peanuts and pound again. Then toss the "dressing" with the papaya, carrot, tomatoes and peanuts.
Chill before serving.
A final note about the dressing... the truth is, the mix is largely personal. I like mine rather sourish and salty, which is the reason for more calamansi juice and fish sauce. Adjust accordingly as preferred!
Saturday, July 19, 2014
Pomelo Citrus Cooler
I had a few fruits in the fridge that were just waiting... The biggest one was a pomelo. Normally I like pomelos and could eat one all by myself but this particular pomelo was dry, and not sweet at all, bordering on bitter in fact.
But I couldn't bear to throw it away (what a waste!) so I had to figure
out a way to repurpose it or else I'd have to eat it!!!
The inspiration came by way of a local magazine, which featured their Pomelo Dayap Cooler sometime in 2012. Of course in their version, they used Davao pomelo, which is presumably sweet and succulent. In my case, my pomelo was weird, to put it tactfully.
With all other things in the fridge that were half consumed... half an orange, a whole lime, and just about a fourth of a lemon (literally a couple of slices!)... I thought, heck, why not, the sweet orange might temper the bitterness of the pomelo...
So, here is my version - with pomelo, orange, lemon, and lime, using agave as sweetener.
There was still a bitter edge but overall, it was a delicious drink! Definitely a better way to use the pomelo!
1 whole pomelo, in segments
1/2 of a large sweet orange, sliced thinly
1 lime, sliced thinly
2 to 3 slices of lemon
1/2 cup agave syrup
about a liter of water
ice cubes (I used up 2 "trays" of ice cubes, about 32 pieces or so)
Place about 1/4 of the pomelo (segments) and orange, lime and lemon slices in a 2-liter pitcher or juice jar.
Meanwhile, place the remaining 3/4 of the pomelo (segments), the ice cubes, agave and water in a blender and whirl away until the ice cubes are crushed. Adjust the sweetness as preferred. Pour the mixture in the pitcher and stir. Chill in the refrigerator until ready to serve.
Tuesday, July 15, 2014
Oyster Cream Soup
I like oysters. Ever since my first taste of "oyster cake", Chinese
style, I've loved oysters. I remember the occasional oyster misua
(wheat noodle) soup that my mom made. And I absolutely adored the super
fresh oysters my (late) uncle treated me to at a famous beach... where
oysters still in their shell (and freshly caught wild) were sold by the
buckets. I remember being mildly shocked that after purchasing a large
bucket, a kettle-full of boiling water was poured over the oysters
(apparently the buckets had holes at the bottom because the water flowed
right out) and that was it! We were given small, sharp, double-bladed
knives (so we could open the shells) and a bowl of native vinegar dip
and we dug in... I was hooked since then! But only the freshest,
sweetest oysters would do for me!
Luckily for me, oysters are not only more common these days, they are available already shucked and swimming in precious oyster liquid. So when I was in the "special" wet market shopping for my special dinner menu, it was easy to pick up a pack of shucked oysters!
My special dinner menu was largely continental-inspired cuisine, so my usual oyster dishes would not do - oyster cake or oyster noodles was definitely not compatible with pasta! So off I went searching in my cookbook library.
I found the recipe in this cookbook (a favorite of mine, image courtesy of google images)
I found the original recipe a bit too rich for me (2 cups whipping cream!??!!) So I just used 2 cups milk, 2 cups oyster liquid and 1/2 cup cream. And to make the whole process even more simple, I just dumped in the oysters in the near simmering broth and let it stew a couple of minutes before putting the heat off (the oysters would still cook in the residual heat and it would not be over-done).
I like the soup, which was simple yet elegant... and very tasty!
Friday, July 11, 2014
Pureed Squash Soup with Curried Paneer and Bacon
I just love multi-function kitchen tools...
The little girl apparently likes squash. And because the little girl is a finicky eater, anything that she says she likes to eat, I will make/cook. So I bought some squash, and set about making pureed squash soup.
Except that as the squash was cooking, I couldn't find my hand blender. I knew I had one, because I'd made pureed soups before but for the life of me, I just couldn't find where it was!
In the middle of searching, what I found was a hand blender attachment to a hand mixer that I was no longer using because I felt it was too heavy. But I took it out of storage because I had no other choice except to use it with the blender attachment. Well, technically I could use the blender but that meant more things to wash, and more time required!
Anyway, long story short, I really could not find my hand blender and honestly, I did not want to buy another one, so I am happy that my (ex)hand mixer has a new lease on life, as a hand blender!
Anyway, here is my soup...
The cubes are curried paneer cubes... homemade, to boot. But I don't think that I will make homemade paneer again. It's rather like tofu and I prefer tofu. Plus, for a liter of milk, I only got about 110 grams of paneer! Which means it is very expensive compared to tofu! In any case, croutons work just as well (or maybe even better) for this soup.
As for the bacon, I found a supplier of no-nitrite/nitrate bacon. And she has scrap bacon for sale, for almost half the price of the slab bacon. And since I needed bacon bits, I didn't really need slab bacon!
To make the soup...
about 800 grams squash, hard rind and seeds removed, diced/cubed
3 cloves garlic, minced
1 medium sweet onion, diced
1 teaspoon dried shrimp, soaked/rehydrated in a cup of hot water
or about a cup of shrimp broth*
vegetable or chicken broth
cubed paneer or croutons
crispy bacon bits
about 1/2 teaspoon black pepper, or to taste
salt, to taste
cream, to serve, optional
Saute the garlic and onion until soft and fragrant. Add the squash cubes and a pinch of salt. Add the dried shrimp with its liquids or the shrimp broth and enough vegetable or chicken broth to just cover the squash cubes. Cook over medium heat until the squash cubes are very soft. Blend the squash (with a hand blender on the stove, or a real blender, in which case, take the squash mixture off the heat and let it cool a bit before whirring in the blender). Season to taste. Bring to a complete boil before serving.
At this point, the soup is quite good on its own, but it's better with cubed paneer (toasted, if preferred) or croutons. And of course, crispy bacon bits!
The little girl ate her soup with a little rice on the side, but not everything else! I guess this means that squash will be seen often on the dinner table...
Monday, July 7, 2014
Sweet and Sour Pork
Quite suddenly, I had a hankering for sweet and sour pork. And I
know myself enough that it's better to just get it over with than deny
it... so here it is -
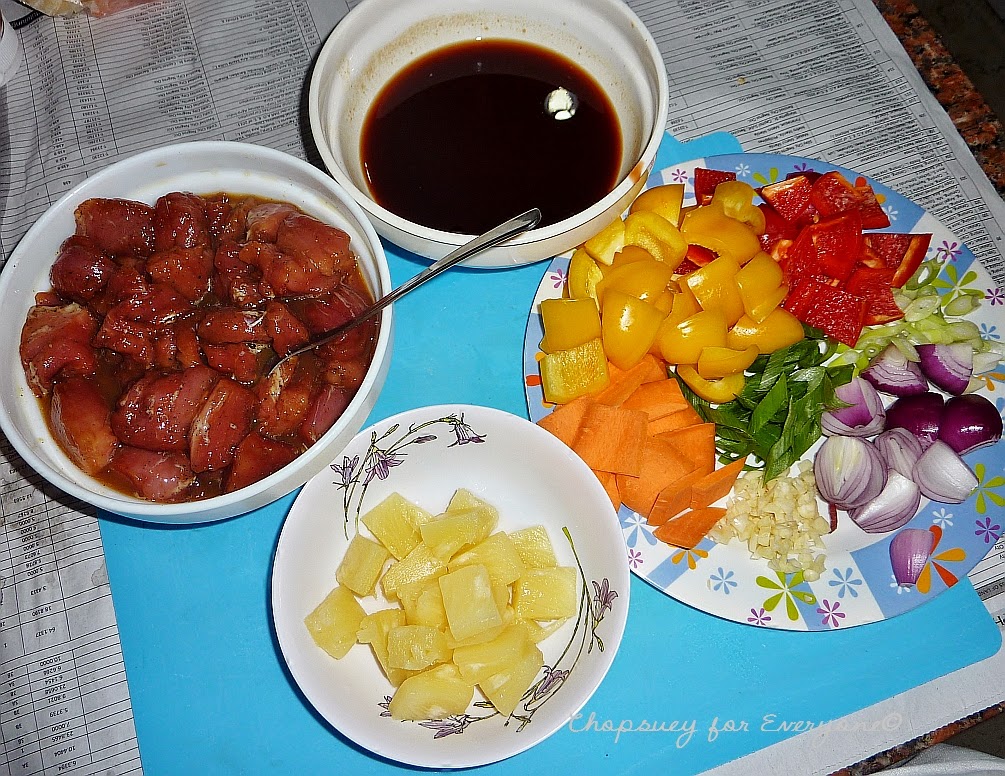
I remember that this is one dish that I was allowed to cook (at age 11 or 12 if I remember correctly). I was given very, very specific instructions to have everything prepared before cooking. It is a practice that I've kept (with very few exceptions)...
My mise en place -
As expected, my craving was sufficiently satisfied.
The recipe (adapted slightly from Yan Kit's Classic Chinese Cookbook
800 grams pork tenderloin, cubed
2 teaspoons light soy sauce
1 egg, slightly beaten
1/3 cup cornstarch (I used AA powder)
2 cloves garlic, chopped up
1 medium onion, skinned and chopped coarsely
1 red bell pepper, seeded and diced
1 yellow bell pepper, seeded and diced
1 small carrot, sliced into "squares"
100 grams canned pineapple chunks, drained, juice reserved
Sauce:
1 tablespoon cornstarch dispersed in 1/2 cup water
1/4 cup pineapple juice (reserved from pineapple chunks)
3 tablespoons white vinegar
1/4 cup sugar (I would use a little less)
1/4 teaspoon salt (or to taste)
1 to 3 tablespoons light soy sauce
2 tablespoons tomato ketchup
1 teaspoon Worcestershire sauce (optional, I always skip this)
leeks, for garnish
Marinate pork cubes in soy sauce for about 15 to 30 minutes. Stir in enough of the beaten egg to coat the pork cubes, then dredge the pork, piece by piece, in the cornstarch (enough to coat but not excessively).
Deep fry the pork, separating the pieces in the wok. Drain on paper towels.
Stir together all ingredients for the sauce. Adjust seasonings (this is important because different brands/spices have subtle differences)
Saute the garlic and onion until soft. Add the green pepper and stir fry until pepper is almost cooked. Add the pineapple chunks.
Lower the flame and add the well stirred sauce. Heat (over low flame) until boiling. A dd the pork cubes. Serve immediately.
(to make the pork crispy, deep fry again before adding to the sauce)
Final Note: different brands of soy sauce have varying degrees of saltiness. Adjust accordingly.
Thursday, July 3, 2014
Crab and Corn Soup
I was in the mood for soup! The rainy weather is certainly right for
it. The question was, what or which particular soup to make. After
all, I like nearly all kinds of soup...
The answer came by way of whatever was available in the pantry and the freezer. In the pantry I found a can of sweet corn kernels. In the freezer, I found 7 pieces of crabstick and a pack of frozen homemade chicken broth. In the fridge, there was a pack of bacon bits. So crab and corn soup it was!
1 small sweet onion, minced
100 grams bacon bits
1 liter of broth or water
1 large can of sweet corn, with liquids
about 7 crabsticks, cut into 3 or 4 segments
salt and pepper, to taste
2 eggs, lightly beaten
Saute the onion and bacon bits. When the bacon is crispy, add the broth or water. Let the mixture simmer then add the sweet corn kernel, together with its liquid (but the liquid is optional). When the soup simmers, add the crabstick. Season the soup, to taste. If desired, thicken with cornstarch slurry. Bring the soup to a boil again then pour in the beaten eggs in a stream, at the same time mixing the soup to break the beaten eggs apart.
Subscribe to:
Posts (Atom)