Showing posts with label pork. Show all posts

Wednesday, December 9, 2015

Sauteed Pork, Taro and Korean Mushrooms

This is another example of cooking without a recipe...


1 small thumb of ginger, sliced thinly
1 small onion, sliced thinly
1 piece of pork tenderloin, cleaned, trimmed and sliced into matchstick strips
1 piece of taro, cubed or sliced in strips
1 pack of Korean shimeji mushrooms
2 pieces Korean King Mushrooms, sliced
light soy sauce
oyster sauce
salt and pepper, to taste

Marinate the pork strips in soy sauce and oyster sauce (a 350-gram piece with 2 tablespoons soy sauce and 1 tablespoon oyster sauce, as well as ground black pepper) for about 15 minutes.

Meanwhile, fry the taro pieces until almost cooked and lightly browned.  Set aside to cool slightly.

Saute the ginger and onions.  Add the marinated pork and cook until half done.  Throw in the mushrooms.  Add chicken stock, 1/4 cup at a time, so the mixture is not too dry.  Finally, add the taro.  Season to taste.  Simmer until done; thicken with cornstarch slurry.

Done!


Friday, September 25, 2015

Pork, Sausage and Beans

Just because I wanted to see if I could do it...  from scratch...


2 cups cooked beans, drained (or for a shortcut, use canned)
250 grams pork, sliced
1 to 2 pieces sausage, sliced
1 medium onion, sliced thinly
4 cloves garlic, minced
1/2 cup tomato sauce
1 small can pimiento, drained, diced
1/4 cup brown sugar or honey
Italian seasoning
bay leaf
2 to 3 pieces dried chili, chopped

Saute onion and garlic.  Add pork and a large pinch of salt.  Add sausage and stir fry serveral seconds.  Add the beans, tomato sauce, pimiento and enough stock to barely cover everything.  Season with Italian seasoning (about 1/2 teaspoon) and salt and pepper, to taste.  Throw in a bay leaf.  Simmer in magic cooker for about 3 hours.

Friday, August 28, 2015

Crown Roast of Pork

This was the crowning glory of dinner (pun intended!) when college buds T and S stayed for a night.  I was lucky that a small one (9 bones instead of the usual 12 or more) was available.  It was the perfect size for 3.

I used to think that a crown roast was a complicated affair.  It would be if I had to make the "crown" myself.  But these days, it comes "ready-made", and can even be ordered in advance from the meat shop.  All I had to do was rub the spice mix all over and let it chill a couple of hours.  Then it gets baked (roasted) in the oven for a couple of hours and it's ready!


It would have been nice (definitely prettier) if I knew how to make those little "chef hats" to cover the ends of the bones...

The spice mix I used was a special blend that my mom gave me (she got it abroad in one of her travels). 

The biggest problem that I encountered was how to carve the roast.  I tried 3 different kinds of knives!  The meaty parts are easy enough to slice (the meat is quite tender!) but I keep hitting some kind of bone and short of hacking the roast, I kept changing knives.

In the end, friend T provided the solution... which I have dubbed the Sxxxx-Hxxxxx Maneuver... simply put, hubby held a bone, T held another and they both pulled!


Easy-peasy!

Who needs a knife?  (The meat was so tender we could "cut" it with a spoon!)


Sunday, June 7, 2015

KBL

KBL refers to an Ilonggo dish - kadyos, baboy at langka (pigeon peas, pork and jackfruit), although in this particular case, the baboy/pork is lechon!  Friend C was generous and brought some (a lot, actually) lechon for dinner a couple of nights ago.   We ate a third of it, made lechon paksiw with another third, and for the final third...


Usually the pork used in the dish is the "pata" part or the leg part.  While the pata makes a tasty dish, I believe using lechon, Cebu-style lechon, in particular, takes this dish up another level!

The souring agent for this particular dish is called batwan.  I honestly do not know what it is in English or if the word is even Filipino!  What I do know is that this batwan is responsible for the Ilonggo dinuguan's superb and superior flavor (in my opinion!)  It is even rumored to be the secret ingredient to an authentic Inasal!


It isn't easy to find butwan, however, so far I've seen it only in my mom's native province, Iloilo.  Sampaloc can be substituted, but truth is, it's not the same!

Here's the recipe: 

3 cloves garlic, minced finely
1 medium onion, sliced
1 medium tomato, sliced
1 kilo lechon meat (pork)
3/4 cup kadyos (pigeon peas), more if preferred
1 piece lemongrass, tied in a bundle
broth, or water, as needed
250 grams unrirpe, sliced langka/jackfruit
3 to 4 pieces batwan (or substitute sampaloc/tamarind)

Rinse the kadyos in water, then cook until softened, about 20 minutes.  Drain.

Sauté garlic, onion, and tomato in a little canola oil.  Add the pigeon peas, lemongrass, langka and lechon.  Pour in enough water to cover everything.  Bring to a boil then season to taste.  When the langka has softened, add the batwan and simmer another 10 to 15 minutes.


Monday, January 12, 2015

Pork Tapa

Tapa, in the local context, refers to cured (or preserved) meat.  Usually the meat used is beef, but pork and/or chicken may be used.  In our case, since hubby no longer eats beef, we use pork.


When I young, tapa (as well as other similar food items) was banned from my mom's dining table... preservatives were bad (my mom said so).  It's a good thing then that there's a way to make tapa without using salitre or "pink" salt.  Here's how I make mine.

500 grams pork, sliced thinly or in thick strips
1/4 cup light soya sauce
2 to 4 tablespoons calamansi juice or native vinegar
1 head of garlic, coarsely chopped
1 to 2 tablespoons brown sugar
1/2 to 1 tablespoon freshly cracked black peppercorns
1 tablespoon canola oil

Mix together soya sauce, calamansi juice, garlic, sugar, cracked peppercorns and oil.  Place the pork in a zip-lock bag and pour the marinade over the pork;  mix well.  Leave in the refrigerator at least 24 hours, preferable 48 hours.

To cook:  Saute about 4 cloves minced garlic in some oil.  For a saucy dish, pour everything into the pan; for a dry tapa, drain the pork before putting in the pan.  Stir fry until the meat is done.

Best served with a fried egg, rice and chopped tomatoes!


Tuesday, October 28, 2014

Thai-style Pork-stuffed Omelet ( ไข่เจียวยัดไส้ด้วย หมู)

When I need comfort, I turn to food...

My first choice is almost always soup, but for today, I am settling for my number 2 comfort food - eggs.

And I remembered that a long time ago, hubby and I ate this supremely tasty pork-stuffed omelet in a (literally) hole-in-a-wall eatery.  Don't ask me where though because we were just walking around and we saw a lot of people going into this door.  We were curious so we went in and up some narrow, rickety stairs was this rambunctious crowd lined up (haphazardly) for food - "turo-turo" (literally "point-point") style.  Which was actually a good thing because we didn't speak a word of Thai and it did not seem like they spoke any English!

Obviously all these people could not be wrong (as to the quality of the food) so we lined up as well and pointed to what we felt we wanted to eat... rice, soup, curry (obviously) and this square parcel of scrambled egg (which I chose because I thought it would not be spicy).  Turns out the best of the lot was the omelette!  It was slightly spicy, but it got really spicy because it was garnished with sriracha sauce!

Here is the latest of many attempts to re-create that dish.


This latest try is the one that looks most authentic... I (finally) checked youtube for demo videos on how to wrap the filling into a square.


For the filling, I found the interet abound with recipes (as usual), but I based my filling (roughly) on the recipe which I found in this book


For the filling:

Marinate for 15 to 30 minutes: 

1 cup ground pork (about 150 to 180 grams)
5 pieces large, shelled shrimp, minced
1 teaspoon sesame oil
1 teaspoon Thai fish sauce
1 teaspoon crushed black peppercorns

Meanwhile, prepare:

3 thin slices ginger, smashed
1 medium onion, minced
4 cloves garlic, minced 
1 large tomato, diced
1 medium potato, diced
small handful wansoy, minced finely
2 teaspoons Thai fish sauce
2 teaspoons oyster sauce
1 to 2 teaspoons chili sauce (or sriracha), optional (for me)

3 eggs, beaten with
1/2 teaspoon fish sauce, or to taste

Heat a wok and saute the ginger, onion and garlic.  Add the tomatoes and stir-fry several seconds.  Add the marinated meat and wansoy; cook a couple of minutes then add the diced potatoes.  Season to taste.  Add water or stock, if necessary (the final mixture should be rather dry).  Cook until done; set aside.

Heat about a tablespoon of canola oil in a non-stick, flat frying pan, 11 to 12 inches in diameter.  When hot, pour in the beaten eggs and spread around to form a thin layer.  When the eggs are cooked, place the cooked ground meat filling in the middle and fold into a square parcel.  Flip into a serving plate.  Garnish with wansoy and serve with sriracha or sweet and sour sauce.


Monday, September 29, 2014

Minced Pork and Shitake over Steamed Tofu

This is a variation of the basic steamed tofu dish (which is just steamed tofu topped with thick soya sauce).  A bit more complicated than the Century Eggs over Steamed Tofu but delicious all the same.


Here's the recipe:

2 blocks of tofu
2 thin slices of ginger
1 small onion, sliced
2 cloved garlic, minced
1 teaspoon XO sauce
4 pieces dried shitake, rehydrated and diced
200 grams ground pork
1 tablespoon soy sauce
1 tablespoon oyster sauce
water
cornstarch slurry

Steam the tofu (I do this in the rice cooker, on top of cooking rice!  Saves on energy!).

Saute the ginger until lightly browned; then discard.  Saute the onions and garlic until soft and fragrant.  Add the XO sauce and stir-fry until fragrant.  Put in the mushrooms and ground pork.  Season with soy sauce and oyster sauce.  The mixture should exude some liquid, if not, add a few tablespoons of stock or water.  Adjust seasonings to your taste (hubby likes a bit of chili for some heat!).  Thicken with cornstarch slurry.  Pour over steamed tofu.

Thursday, August 7, 2014

Menudo, My Way

Where I'm from, menudo is a tomato-based stew of pork and liver.  Usually it also has tomatoes, carrots, raisins, garbanzos, green peas, pimientos and red hotdogs!  It's definitely not the Mexican menudo, which is with tripe.

My version always skips the peas (which I loathe) and the raisins (which I like on their own but not in cooked food).  I always use liverspread instead of actual liver (because while I like the flavor, I do not like the texture!).  I also like putting in garbanzos and red hotdogs, but since hubby does not like either of those things (and for once, I acquiesced and used real liver), this is how our menudo is -


My recipe...

800 grams pork shoulder, skin trimmed off
200 grams pork liver
2 thin slices of ginger
4 to 6 cloves garlic, minced
1 large sweet onion, minced
4 largish tomatoes, sliced
1 to 2 large pimientos, sliced
3 medium sized potatoes (about 500 grams total), diced
1/2 cup tomato sauce (optional)
3 pieces dried bay leaves
salt and pepper, to taste

Dice or cube the pork and liver in roughly the same size (I like the pieces in 1-inch cubes).  Marinate in a little soy sauce for about 10 minutes.

 Saute the ginger and flash fry the liver.  Remove from the pan and discard the ginger.

Saute the garlic and onion until soft and fragrant.  Add the tomatoes and pimientos.   Stir fry several minutes then throw in the pork and stir fry a couple of minutes.  Add the tomato sauce, if using, and the potatoes.  Pour enough water or stock to barely cover the meat and potatoes.  Season to taste.  Throw in the bay leaves.  Let simmer until pork is cooked and sauce is slightly thickened and reduced.  Put back the liver and remove from heat once the mixture comes to a soft boil.

Serve on top of steamed rice!


Sunday, August 3, 2014

Pork, Liver and Celery Stirfry

This week has indeed been busy, and I mean even the nights!  We're usually home for dinner but for some reason or another, this week found us having dinner out... for meetings or with friends.  Tonight is actually the first night this week that I cooked dinner!  And it's the weekend already!

This dish is a request from hubby.  It seems we had been having chicken more often than usual so he was missing pork a bit.  He specifically asked for stir fried pork with celery, but when we found really fresh pork liver, he asked if we could have some in the stirfry too.  My reply?  Of course!  I may not be a fan of liver but I do like its flavor (it's the texture that puts me off)


It's quite easy to make, too!

2 small pork tenderloin pieces (about 600 grams total)
150 grams pork liver
about 4 to 5 large stalks of celery, sliced diagonally
4 slices of ginger
1 small onion, sliced
1 clove garlic, minced
1 to 2 tablespoons soy sauce
1 tablespoon oyster sauce
cornstarch slurry

Slice the tenderloin into thin strips then marinate in a tablespoon of soy sauce and some black pepper for about 10 to 15 minutes.  Meanwhile slice the liver into triangles (this is "traditional" shape that I grew up with) and marinate in a teaspoon of soy sauce for 5 to 10 minutes.

Heat a wok until almost smoking and throw in the ginger.  After a couple of seconds add the liver and flash fry a few seconds only.  Remove the liver from the wok.  Saute the onion and garlic.  Add the celery and the pork tenderloin.  Season with another tablespoon of soy sauce (or as preferred) and oyster sauce.  Stir fry until pork is cooked.  Add the liver back to the pan and stir fry another couple of seconds.  Thicken the sauce with cornstarch slurry.

It was perfect on top of rice, on this rainy evening!


Monday, July 7, 2014

Sweet and Sour Pork

Quite suddenly, I had a hankering for sweet and sour pork.  And I know myself enough that it's better to just get it over with than deny it... so here it is -


I remember that this is one dish that I was allowed to cook (at age 11 or 12 if I remember correctly).  I was given very, very specific instructions to have everything prepared before cooking.  It is a practice that I've kept (with very few exceptions)...

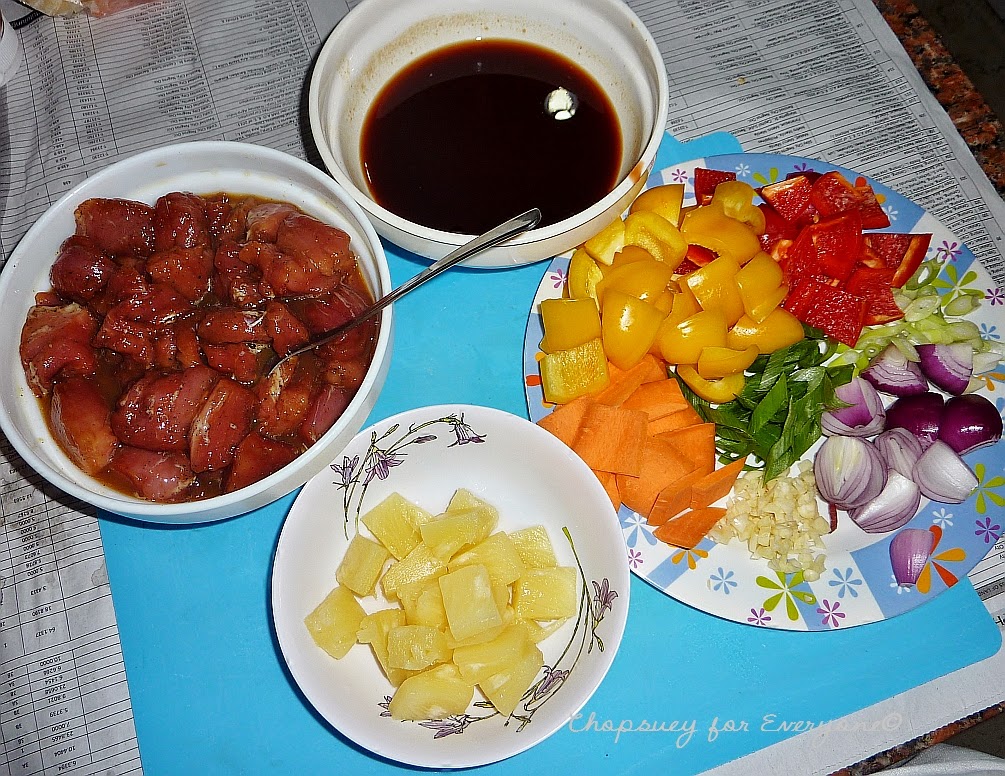
My mise en place -


As expected, my craving was sufficiently satisfied.

The recipe (adapted slightly from Yan Kit's Classic Chinese Cookbook

800 grams pork tenderloin, cubed
2 teaspoons light soy sauce
1 egg, slightly beaten
1/3 cup cornstarch (I used AA powder)

2 cloves garlic, chopped up
1 medium onion, skinned and chopped coarsely
1 red bell pepper, seeded and diced
1 yellow bell pepper, seeded and diced
1 small carrot, sliced into "squares"
100 grams canned pineapple chunks, drained, juice reserved

Sauce:

1 tablespoon cornstarch dispersed in 1/2 cup water
1/4 cup pineapple juice (reserved from pineapple chunks)
3 tablespoons white vinegar
1/4 cup sugar (I would use a little less)
1/4 teaspoon salt (or to taste)
1 to 3 tablespoons light soy sauce
2 tablespoons tomato ketchup
1 teaspoon Worcestershire sauce (optional, I always skip this)

leeks, for garnish

Marinate pork cubes in soy sauce for about 15 to 30 minutes.  Stir in enough of the beaten egg to coat the pork cubes, then dredge the pork, piece by piece, in the cornstarch (enough to coat but not excessively).

Deep fry the pork, separating the pieces in the wok. Drain on paper towels.

Stir together all ingredients for the sauce.  Adjust seasonings (this is important because different brands/spices have subtle differences)

Saute the garlic and onion until soft.  Add the green pepper and stir fry until pepper is almost cooked. Add the pineapple chunks.

Lower the flame and add the well stirred sauce.  Heat (over low flame) until boiling. A dd the pork cubes.   Serve immediately.

(to make the pork crispy, deep fry again before adding to the sauce)

Final Note: different brands of soy sauce have varying degrees of saltiness. Adjust accordingly.

Wednesday, June 18, 2014

Diced Tofu, Shitake and Pork

This is another childhood favorite, although I remember it as having "vege-meat" (wheat gluten) cubes as well.  My siblings and I (literally) fought over this dish! 

The best way to serve it?  Piping hot over a bowl of rice!  Oh, topped with spring onions!


To make it:

1 small onion, diced
3 cloves garlic, minced
400 grams lean ground pork (or any ground meat)
about 10 to 12 pieces dried shitake, rehydrated then diced
1 to 2 tablespoons light soy sauce
1 piece firm tofu, cubed
1 to 2 tablespoons oyster sauce
dark soy sauce, to taste (optional)
salt and pepper, to taste

Saute the garlic and onions.  Add the ground pork.  Sprinkle with a little salt and pepper; stir fry a couple of minutes.  Add the mushrooms.  Splash soy sauce, stir until the mushrooms are partly cooked.  Throw in the tofu.  Add oyster sauce.  The mixture should give up some liquid, if not, add about 1/4 to 1/2 cup stock or water.  Season to taste.  Simmer until everything is cooked.  If desired, thicken the dish with some cornstarch slurry.  Adjust seasonings, according ot personal taste.


Tuesday, May 6, 2014

Pork Estofado

In all honesty, this is probably the first time I've eaten estofado.  The reason?  Bananas.  As far as I am concerned, bananas are ingredients for dessert, or sweets.

But B's A-te J was raving about an estofado dish she had recently eaten and she wanted to share it with us...

So yes, this dish is entirely A-te J's!


Here's her recipe... in as much as I could follow it (since she didn't exactly use measuring cups and spoons!)

4 pieces ripe saba bananas, cubed
1 whole bulb of garlic, smashed
1 big onion, sliced
1 tablespoon peppercorns
1 kilo pork shoulder (kasim), cubed
2 cups stock or water
1/2 cup tuba vinegar
1/4 cup soy sauce
1/4 cup sugar
2 pieces bay leaves

Fry the saba banana cubes; remove from the pan and set aside.

Saute the garlic, onions and peppercorns.  Add the pork cubes and stir fry until lightly browned.  Pour in the stock/water, then vinegar; do not stir until the liquid boils.  Season with soy sauce, sugar and salt, if desired.  Throw in the bay leaves.  Simmer until pork is almost tender; add the fried bananas.

I did like the dish, and it was an interesting mix with the sweetness of the bananas adding something to the dish.  But truth be told, I stayed away from the bananas themselves!


Friday, May 2, 2014

Adobo sa Dilaw

I love adobo, especially when it's done the way I like it (it is said that adobo has a thousand and one recipes, as each family would have its own "secret" recipe).  But recently I discovered a totally different way of adobo.  And it's one that we really, really like... The thing is, it does not have soy sauce as an ingredient!

The first time I made this dish was a couple of weeks ago, quite by chance.  I had recently discovered yellow ginger (or turmeric) and had bought quite a lot.  So I had been looking for recipes that used it as an ingredient.

There was none in my foreign cookbooks.  And while I found an article about a regional dish popular in the south, describing "original" adobo dish made with local vinegar, no soy sauce and turmeric, there wasn't a recipe attached to the article.  So I started experimenting.

The first time I made it, I winged it by following a basic adobo sans the soy sauce.  I discovered that the dish was a tad sour and rather bland without a salty component.  I fixed the sourness by adding soda and the blandness by adding a couple of large pinches of sea salt.


The result?  A really happy hubby!!! 

At that time I really did not intend to share the recipe.  But as luck would have it, BFF and I were talking the other day, and she mentioned that contrary to most of our countrymen who are lovers of adobo, she vehemently disliked adobo.  (She was referring to the dark colored, soy sauce rich adobo that was the norm.)  And I told her that she just had to try this particular kind of adobo!

So, on our next get together (a few days after), as a special treat for her, I cooked another batch of adobo sa dilaw!


She tasted it and liked it so much that she asked for the recipe. 

So here it is!

1 kilo pork, cubed
4 pieces yellow ginger
6 cloves garlic, minced
1 tbsp black and white peppercorns
1/3 cup tuba vinegar
1 cup soda water (7-Up or Sprite)
1 cup water
2 pieces bay leaf
1 teaspoon sea salt
sugar, to taste

Saute the yellow ginger, garlic and peppercorns.  Add the pork cubes.  Cook until the pork is lightly browned.  Pour in the vinger, soda and water; do not stir until the liquid boils.  Throw in the bay leaves and season with salt, and sugar, if desired.

Simmer until the pork is tender (for smaller cuts of pork it's about 30 minutes).  That's it!


Tuesday, February 4, 2014

Shredded Pork with Enoki

I love mushrooms in general.  Golden mushrooms, or enoki, in particular, is a favorite of mine!  Thank goodness they're more readily available these days.

And here's one of my favorite ways of cooking enoki -


It's an easy stir fry dish that's on the table in about 30 minutes or so... assuming the meat is not frozen, that is.

The best cut of pork for this dish is tenderloin.  Slice about 250 grams of pork tenderloin into strips (my mom called them shreds, hence the title) and  marinate (for about 15 minutes) in a mix of 1 tablespoon shao xing wine, 1-1/2 tablespoons light soya sauce, 1/2 tablespoon sesame oil, 1/2 tablespoon cornstarch and about 1/2 teaspoon crushed black peppercorns.

While the meat is marinating, prepare the other ingredients - (1) about 3 thin slices of ginger, (2) 1 small onion, sliced thinly, (3) scallop or abalone XO sauce, to taste [I use about 1 teaspoon], (4) 200 to 300 grams golden mushrooms, cleaned and pulled apart into "shreds", and (5) 2 egg whites, lighlty beaten.

Heat some oil in a wok until very hot and saute the ginger and sliced onions.  When the ginger browns and the onions are soft, toss in the XO sauce and saute the mixture briefly.   Give the pork shreds a quick stir and drop into the hot wok, stir-frying until the pork shrinks a little (indicating that it's halfway to being done).  The mixture may appear quite oily.  Add the mushrooms and stir (at this point I usually add another tablespoon or so of soya sauce but be careful because some soy sauces are saltier than others; also, a friend of mine adds half a teaspoon of brown sugar and swears that the dish is better, but I've never tried it).  After a several minutes, the enoki should be "sweating" and the dish will appear soupier and less oily.  Do a taste test and adjust the seasonings according to your preference.  Pour in the egg whites while stirring the wok to break apart the egg whites.  Turn off the heat.  Serve immediately!


Friday, December 27, 2013

Lechon Congee

Yup.  Still on Christmas food... specifically, leftovers...

But still delicious!  Really.

Here's one in defiance of lechon paksiw!  Lechon lugaw!  from leftover lechon and leftover rice...


Ok, the problem here is that this is a dish without a recipe...  I did not measure anything and just winged it... like this -

a big bowl of mixed lechon pata and laman (pata is the leg part and laman is meaty parts)
about a third of the rice cooker "bowl" of leftover rice
about twice as much water or chicken stock as the rice (or more if you like a soupier lugaw)
thin slices of ginger
sliced onions
minced garlic

Saute the ginger, onion and garlic.  Throw in the lechon.  Add the water or chicken stock.  Lastly add the rice.  Then stir, stir, stir.  Cook on low-medium heat until thick and creamy.  For this particular dish, we wanted a soupy congee so I added more water.  Season with salt and pepper (or patis/fish sauce).

It was perfect for breakfast this chilly morning!


Saturday, November 9, 2013

Paksiw na Pata, Filipino style

Paksiw is a favorite "seasoning mix" of mine but pata (pork leg or hock in English) as a meat part is definitely not one that I prefer.  For one thing, it has too much skin/fat, hence less meat, and it takes a LONG, LONG time to cook until tenderized.  But for some unknown reason, I got some while I was at the supermarket with lola a couple of weeks ago.

I usually make the Chinese style Paksiw, using chunks of pork belly or pork shoulder but this time, however, I wanted to try a different recipe... and the pressure cooker (which is so rarely used!)... since I only had about an hour to cook - to simmer the dish on the stovetop would take a couple of hours!

I decided to follow a recipe found in a cookbook given to me - Our Family Table (Heirloom Recipes & Others, compiled and edited by Carolina Guevarra) - although I haven't seen this for sale in bookstores.


Anyway, here is my dish...


While my basis for this dish was the original recipe found in the book, I found that in order to adapt the recipe to the pressure cooker, I had to make a few changes, the most crucial of which was to change the proportion of the liquids, since I had to have enough liquid to cover most of the meat (I also like a saucier dish!).  Anyway, here is what I did -

First thing is to have a whole piece of pork pata (front part preferred) sliced into pieces (and I discarded the "hoof" part).  Second thing is to clean and parboil the pata.

Then I placed the pata, together with the following in the pressure cooker.

1 cup native vinegar
1/2 cup soy sauce
2 tablespoons brown sugar
3 pieces bay leaves
about 2 teaspoons dried marjoram
2 tablespoons smashed peppercorns (not ground pepper)
1 whole bulb of garlic, smashed
a lot of banana blossoms, knotted
about 1 to 2 cups water

A note for the water, I initially added a cup but it seemed too little to cover the meat pieces so I added half a cup more.

Another note regarding the marjoram - the recipe specified oregano and I thought I had some in my spice cupboard but I couldn't find it so I used marjoram instead.

Anyway, place the cover on the pressure cooker and pressure cook 15 to 20 minutes (after the cooker begins to whistle).  Let the pressure go down and open the pot.  Check if the pork pata is cooked/soft then check seasonings.

I had to adjust mine by adding a couple tablespoons more soy sauce (because I use a less salty, light soy sauce).

Final note - I found other recipes in other cookbooks where the sugar is a whole lot more than 2 tablespoons.  But while I wanted a hint of sweetness, I did not want an overly sweet dish!


Thursday, October 17, 2013

Pork with Barbecue Sauce in Mini Ciabatta Rolls

Hubby asked me if I could make snacks for his get together with friends.  It was for about 20 people and I had little time.  He needed it tomorrow and all I had in the freezer were sukiyaki-cut pork!  I also had mini ciabatta rolls and some lettuce.  So I guess it was pork in ciabatta rolls for their snack.  The question was how the pork would be seasoned.

I thought the easiest and fastest would be to marinate the pork overnight in a barbecue sauce.  In this particular case, a homemade sauce is NOT necessary.  In fact, I used a store bought sauce for this recipe...

Easy, peasy recipe...

Marinate 1.5 kilograms of pork sukiyaki in 1-1/2 cups of barbecue sauce, at least an hour, preferably overnight.

The next day, slice 2 to 3 BIG onions and saute them until softened, not browned.  Add the pork and stir fry until done, with the sauce reduced to almost nothing but a thick clingy mass attached to the pork strips.  (Hint here, it may be a good idea to cook in batches so that the pork remains soft.  Too big a batch results in uneven cooking.)  After cooking, mix the pork together and toss with about 1/3 to 1/2 cup more barbecue sauce.

To make the sandwiches, toast the ciabatta rolls.  Line with lettuce and stuff with pork.

And here they are:


I got about 36 sandwiches (although the rolls were of varying sizes).  I'm also happy to say that the sandwiches were a big hit!

Tuesday, September 24, 2013

Chairman Mao's Red Braised Pork

or 毛氏紅燒肉 (máo shì hóng shāo ròu)

This recipe is by Fuchsia Dunlop, found in her book:  Revolutionary Chinese Cookbook (Recipes from Hunan Province)

(image lifted from Google images)

According to Wikipedia, Hunan is a province of the People's Republic of China, located in the south-central part of the country to the south of the middle reaches of the Yangtze River and south of Lake Dongting.  It is said to be one of the most beautiful provinces of Chines, being surrounded with the natural beauty of mountains all around the its east, west, and south sides, and by the Yangtze River on its north side.  Its cuisine?  Hot, delicious, and hot!

The name "red braised pork" indicates the method of cooking used - red braising, or red cooking, which is basically a cooking technique where food, typically meat, is browned with caramelized sugar, after which the meat is stewed in a rice wine and dark soy sauce broth, with spices, for some time.

As for the possessive aspect of the title, it is said that this is the favorite dish of Chairman Mao (Tse-Tung, founder of the People's Republic of China).  The dish is so famous that the Chinese government has even issued guidelines for it, otherwise the restaurant or chef/cook making and serving it cannot claim that it is authentic.  One of the regulations involve a specific kind of pork/pig meat to be used.  Interesting, huh?

Anyway, here is my dish:

Still in the pan, final 5 minutes of braising -


And, on the table, ready to be devoured -


The recipe can be found here.

My dish did not come out looking as well as the photo in the book (which is incidentally the book cover photo also) but that may have been because of -

1.  I am not so fond of pork fat or skin, so I trimmed them off.  And I sliced my meat in smaller chunks.  These appear to have the biggest impact since my dish was not "gelatinous" due to the leanness of the meat I used.
2.  I did not have dark soy sauce so I used light soy sauce, which meant that my dish would not have an intense red-brown color.
2.  I braised my dish for about 45 minutes only.  My reason?  I ran out of time because the first time I tried to caramelize the sugar, it ended up being burnt because the little girl kept calling me...  apparently, the longer the meat is braised, the better.

Nevertheless, the dish was really delicious.  Even hubby was impressed!

Yay!

September 25, 2013

Not being satisfied with my pale dish, I went out and bought dark soy sauce and made the dish again.  This time, I kept the skin on the pork and sliced the pieces bigger... and I cooked the dish in my magic cooker for about 4 hours...


I like the result.  The color is lovely, and the meat was sooooo soft...

Double yay!


Wednesday, September 18, 2013

Lechon Lomi

There was a time when I twiddled my thumbs and wondered what to do with left over lechon.  You see, it has been a tradition for us to have a whole (big) lechon at Christmas time.  And no, it's not just for us, we share it with the people we are close to everyday.  But almost always, there would be left over lechon - mostly the head, feet and rump parts - which we inevitably make into the traditional paksiw.

Not that I'm complaining - don't get me wrong, I love paksiw na lechon - but at the back of my head, there's this thought:  there must be some other dish that lechon can be part of OTHER THAN PAKSIW!!!

Well, thing is, I've been seeing lechon stalls in food courts with offerings such as:  lechon sisig, lechon sinigang, lechon dinuguan, lechon lugaw, and this:

LECHON LOMI


The recipe is pretty much the same as my usual lomi except that I used 500 grams of lechon in place of all the "meats".  The revised recipe -

500g Lomi noodles, parboiled, rinsed and drained
shallots (at least 6 pieces), sliced
4 slices of ginger
8 cloves garlic, minced
about 6 cups chicken stock
500 grams lechon, chopped
1 medium carrot, julienned
1 stalk celery, sliced diagonally (celery leaves to be used too)
Baguio pechay or shredded cabbage, shredded
2 to 4 tablespoons soy sauce
salt and pepper, to taste
cornstarch dispersed in water
2 to 3 eggs, beaten lightly
For the garnish:
1 to 2 stalks leeks, green part only, sliced diagonally

Heat oil over low heat and brown the shallots (keep heat on low).  When the shallots have browned, remove them from the oil and increase the heat to medium-high. 

Saute the ginger and garlic (add more oil, if necessary).  Pour in the stock and let it boil.  Add the lechon, carrot strips and celery leaves.  Season with soy sauce, salt and pepper, to taste.  Let the mixture boil again then add the noodles and pechay leaves.

When the mixture boils again, thicken with cornstarch water.  Check seasonings again.  Then, while stirring constantly, slowly pour in beaten eggs, while stirring.  Remove from heat immediately.

Before serving, garnish with leeks and browned shallots.  Serve with calamansi and fresh ground pepper on the side.

It's yummy for such a day like today...


Monday, September 9, 2013

Picadillo

Picadillo is one of those dishes that reflect the Spanish influence in Filipino cuisine.  It is dish traditionally made with ground beef, tomatoes, and spicy seasonings such as cumin, paprika, etc.  The Filipino version is usually made with tomato sauce or paste, with raisins added, or boiled eggs, potatoes, red/green bell peppers.  If the dish is served with saba - apparently a local cardaba variety not usually found elsewhere (perhaps a plantain banana can be substituted) - the dish is called Arroz a la Cubana.

In my version, I always skip the raisins and potatoes, and add diced bell peppers and boiled quail eggs.  And while the traditional Filipino style of picadillo is saucy, using tomato sauce and beef, I like mine rather dry, and I use ground pork and real tomatoes.


The recipe -

quail eggs, about 2 dozen, hard boiled

about 500 grams pork tenderloin, ground coarsely
1 tablespoon light soy sauce
fresh ground pepper

1 large sweet onion, chopped coarsely
3 cloves garlic, chopped coarsely
1 large tomato, diced
1 large green bell pepper, diced
1/2 teaspoon cumin
1/2 teaspoon chili
salt and pepper to taste

Mix the ground pork tenderloin with the soy sauce and ground pepper.  Set aside for about 10 to 15 minutes.

In the meantime, prepare the other ingredients.

Saute the onion, garlic and tomatoes.  Add the green pepper and ground meat.  Throw in the cumin and chili (and sometimes I even add crushed chili flakes because hubby likes it spicy).  Add the hard boiled eggs (shells removed, of course). Season accordingly to taste.

Note:  ground beef or ground chicken may be used instead of pork